How to Build a Site With Keyboard Navigation: PSD to HTML
Today we’ll be looking at how to add keyboard navigation to a website using a few simple lines of JavaScript. First we’ll create a simple site theme in Photoshop and then transform it into a working website that uses keyboard functions to switch pages.
2 Million+ Digital Assets, With Unlimited Downloads
Get unlimited downloads of 2 million+ design resources, themes, templates, photos, graphics and more. Envato Elements starts at $16 per month, and is the best creative subscription we've ever seen.
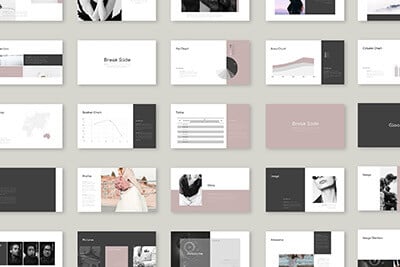


Here’s a screenshot of what we’ll be building. Click on the picture to see the live example:

Photoshop Work
To start things off, open Photoshop and create a new 800px by 600px document at 72dpi.
Radial Gradient

Next grab the gradient tool and stretch a radial gradient over the background. Your foreground color should be set to #343636 and your background color to #121414. Make sure the lighter color doesn’t run into the edges of the document or you’ll get a hard edge when we place it into our CSS.
Type
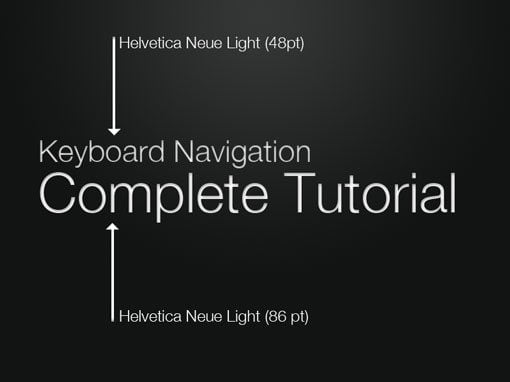
Now grab the type tool and choose a font. I chose Helvetica Neue. Type some text for your homepage like above, then copy that layer and change the type to read “About Me.” Repeat that step for “My Portfolio,” and “Contact Me.”
Inner Shadow
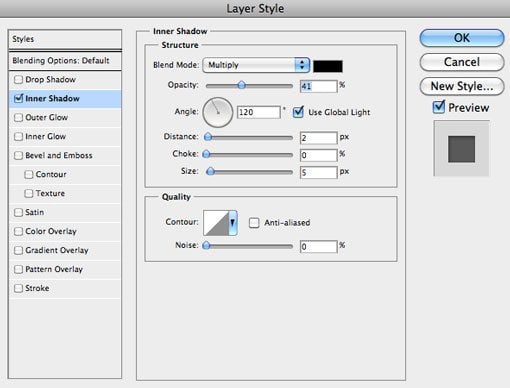
Now place an inner shadow on all the text layers you just created using the settings above. You can apply the effect to one layer, then right click and go to “copy layer style,” then right click on the other layers and paste the layer style.
Navigation Key


Now create a key to instruct users how to use the keyboard navigation feature. Using the same font, type out the text in blue and apply an outer glow to give it a nice, radiant effect. Look at the screenshots above for the specific settings. Be sure to leave some space in between parentheses for the arrows in the next step.
Arrows

Grab the custom shape tool (found under the rectangle tool fly out menu) and select an arrow as your shape. Draw four arrows (up, down, left, and right) and apply the same color and outer glow as the type. Now place the arrows in the parentheses from the previous step.
Save the Four Versions
Now go to “Save for Web & Devices” under the file menu. Save out each version (Home, About, etc) as a jpg into a folder named “images.” Now we’re all done in Photoshop so close that out and move over to your favorite text editor or web development suite. I use the fantastic Mac application Espresso.
The HTML
Create an index.html file in the same directory as the images folder you create before. Add in a basic HTML structure that links to a CSS and JavaScript file.
<!DOCTYPE html PUBLIC "-//W3C//DTD XHTML 1.0 Strict//EN"
       "http://www.w3.org/TR/xhtml1/DTD/xhtml1-strict.dtd">

<html xmlns="http://www.w3.org/1999/xhtml" xml:lang="en" lang="en">

<head>
       <meta http-equiv="Content-Type" content="text/html; charset=utf-8"/>
       <title>Page Title</title>
       <link rel="stylesheet" href="style.css" type="text/css" media="screen" charset="utf-8"/>

		<SCRIPT SRC="script.js">
		</SCRIPT>

</head>

<body>

</body>

</html>
Adding a Navigation Menu
We don’t want our site to run purely on keyboard navigation so we’ll add in a visual navigation menu as the primary method of getting around. To do this we’ll create a “nav” div inside a “container” div in the body portion of our HTML. Inside the nav div, place an unordered list of links like below.
<body>

	<div id="container">
		<div id="nav">
			<ul>
				<li><a href="index.html">Home</a></li>
				<li><a href="about.html">About</a></li>
				<li><a href="portfolio.html">Portfolio</a></li>
				<li><a href="contact.html">Contact</a></li>
			</ul>
		</div>
	</div>

</body>
Create the Other Pages
As I said before, we want to keep the HTML in this tutorial simple so we’ll stop there for the homepage. Duplicate this code into three more html files: about.html, portfolio.html and contact.html. In each of these files, change only the name of the container div. In the about file, change it to “aboutContainer.” Follow suit with “portfolioContainer” and “contactContainer” in the other two.
Adding the CSS
You should now have four essentially blank web pages containing only a list of unstyled links. Create a style.css file and start it off with the following basic styling.
body {
   margin: 0px; padding: 0px;
   background-color: #121414;
   color: #000000;
   width: 800px;
   margin: auto;
   font-family: "HelveticaNeue-Light", "Helvetica Neue Light",
      "Helvetica Neue", Helvetica, Arial, "Lucida Grande", sans-serif;
   font-weight: 300;
}
Here we’ve essentially just set a background color (matching the background color of our PSD) and set the font-family to be a nice, thin Helvetica. Margin auto will make sure our content stays centered.
Adding the Background Images
Here’s where everything starts to look right. Style each of the four container divs to have the four backgrounds we setup in Photoshop.
#container {
	padding: 0px; margin: 0px;
	background-image: url(images/background.jpg);
	height: 600px;
}

#aboutContainer {
	padding: 0px; margin: 0px;
	background-image: url(images/about.jpg);
	height: 600px;
}

#portfolioContainer {
	padding: 0px; margin: 0px;
	background-image: url(images/portfolio.jpg);
	height: 600px;
}

#contactContainer {
	padding: 0px; margin: 0px;
	background-image: url(images/contact.jpg);
	height: 600px;
}
At this point your pages should be taking shape and look something like the image below:

Styling the Navigation Menu
One last chunk of CSS will finish off the navigation menu.
#nav {
	padding-top: 50px;
	padding-left: 20px;
}

#nav a {
	text-decoration: none;
	color: #ffffff;
}

#nav a:hover {
	color: #a2def9;
}

ul {
	text-decoration: none;
	list-style: none;
	color: white;
}

li {
	display: inline;
	padding-right: 30px;
}
As you can see, I’ve applied some padding to the main nav div and removed any text-decoration from the link text. Then I set the text color to white and added a hover effect matching the color of the blue text in the “Nav Key” at the bottom of the page. Finally, I’ve added in few lines to specifically target the list items and spread them out a bit.
If you’ve followed along, your page should match the following screenshot:
JavaScript
You should now have a basic, functioning four page site! The links in the navigation menu should allow you to switch between pages with relative ease. Now we will get into the heart of the project: adding keyboard navigation. It’s actually a fairly straightforward process and should only take you a few minutes at the most. Our JavaScript will be inspired by this tutorial but taken in a different direction.
Setting up the Script
Create a script.js file and insert the following code:
document.onkeyup = KeyCheck;

	function KeyCheck(e)
		{
		   var KeyID = (window.event) ? event.keyCode : e.keyCode;

		   switch(KeyID)
		   {

		   }
		}
As you can see, this code is quite brief and very basic. Essentially, we tell JavaScript to run the function “KeyCheck” when the user presses a key. The KeyCheck function is then tied to the variable “KeyID.” This will watch what a user presses and set the value to KeyID. Now we’ll add in a line of code that tells it what to do if the KeyID matches a certain criteria.
document.onkeyup = KeyCheck;

	function KeyCheck(e)
		{
		   var KeyID = (window.event) ? event.keyCode : e.keyCode;

		   switch(KeyID)
		   {

		      case 49:
		      window.location = "index.html";
		      break;

		   }
		}
This code is a bit confusing. As indicated on our navigation key, we want to program the numbers 1-4 and the arrow keys to jump to specific pages. Here we’ve setup a case that says: if the code “49” is returned, switch to the page index.html (through window.location). You’ve probably notice code 49 isn’t an intuitive way to refer to pressing the number one. To discover the key codes for a given key, go to this page and scroll down to section 3.3. We see that the numbers 0-9 are referred to by the codes 48-57. Scroll down further and see that the arrow key codes are as follows: 37 (left arrow), 38 (up arrow), 39 (right arrow), 40 (down arrow). Using this set of codes as a guideline we can program each key press to correspond to a page.
document.onkeyup = KeyCheck;

	function KeyCheck(e)
		{
		   var KeyID = (window.event) ? event.keyCode : e.keyCode;

		   switch(KeyID)
		   {

		      case 37:
		      window.location = "index.html";
		      break;

		      case 38:
		      window.location = "about.html";
		      break;

		      case 39:
		      window.location = "portfolio.html";
		      break;

		      case 40:
		      window.location = "contact.html";
		      break;

		      case 49:
		      window.location = "index.html";
		      break;

		      case 50:
		      window.location = "about.html";
		      break;

		      case 51:
		      window.location = "portfolio.html";
		      break;

		      case 52:
		      window.location = "contact.html";
		      break;
		   }
		}
Fin!
That’s all there is to it! You should now be able to navigate your site using just the arrow and number keys as with the opening example. Use the comments below to let us know if you think this is a good idea and whether or not you’ll be adding keyboard navigation to your site. There’s definitely more than one way to go about it so also let us know any ideas you have for an alternate method of implementing the keyboard shortcuts.