Design an iPhone App Website Template With E-Mail Signup
If you’ve been on the scene with iOS then you’ve surely seen some of the beautiful app websites cropping up. These have been released over the past couple of years as developers have been looking for ways to attract marketing potential. There are a lot of very standard-looking templates out there for web designers – but my hope is to tackle something new!
Today we’ll be creating a styled iPhone App website template using HTML5/CSS3. This will not be targeted onto a specific app, so we don’t include a download link to the app store. Instead I’ve created a small e-mail signup form through MailChimp so you can hook early adopters into the app for pre-release. This is great for developers who need to get something up and running for their product before it’s on the market.
2 Million+ Digital Assets, With Unlimited Downloads
Get unlimited downloads of 2 million+ design resources, themes, templates, photos, graphics and more. Envato Elements starts at $16 per month, and is the best creative subscription we've ever seen.

Try it Out
View Live Demo – Download Source

However, if you’ve noticed the app screenshot I’m using is from an actual app. It’s called Ballin ~ Dribbble for iPhone and just popped into the store a few weeks ago. This layout isn’t used to condone the Ballin app, instead I just needed a screenshot to include for demo purposes. But feel free to use another screen if you copy the template for your own website.
Getting Started
As always we start off with some very simple HTML page structure. If you checked out the demo everything we need is centered in the page and aligned properly. The code isn’t convoluted at all! I’m using the standard HTML5 doctype with 3 external files included.
<!DOCTYPE html>
<html lang="en">
<head>
	<meta http-equiv="Content-Type" content="text/html; charset=utf-8" />
	<title>iPhone App Website with E-mail Signup</title>
	<link rel="stylesheet" type="text/css" href="global.css" />
	<script type="text/javascript" src="http://ajax.googleapis.com/ajax/libs/jquery/1.6.2/jquery.min.js"></script>
	<script type="text/javascript" src="http://downloads.mailchimp.com/js/jquery.form-n-validate.js"></script>
</head>
The first is our global.css styles in an alternate file. Second we need the latest jQuery library hosted through Google Code databases. And finally I’ve added the form validation script from MailChimp. This script tag is normally copied over into your body area with the e-mail signup form, but to simplify the code I’ve moved it into the head.
So now let’s focus on parts of the body. I will skip over our e-mail signup just for now so we can focus on the bare-bones styles and framework. After opening the body you’ll notice an ID #iphone-preview which is used to house the Ballin’ app iPhone screenshot. We’re actually using only two images in this webpage – the iPhone screen and our blue gradient background.
Also as a quick note I’ve used an iPhone 4 PSD file for creating the graphic. You can check it out at the Macristocracy blog where Jake Moore has offered the free PSD for download. Or alternatively just download directly from his CloudApp link without visiting the page!
<body>
<div id="iphone-preview" class="wrap">
	<img src="img/ballin-app.png" alt="Ballin' App Preview" />
</div>

<div id="main-content" class="wrap">
	<h2>sign up below for instant e-mail updates and early <em>beta access</em> in the app store!</h2>
Now below the iPhone we have an ID #main-content which is similarly given a class of wrap. This means the content will be centered on our page regardless of resolution size. Inside the h2 tag I nested an em for emphasis on the words beta access. Using CSS I styled the em element to give a light pink coloring so these will stand out much more! Everything else is focusing on our e-mail signup, so let’s jump into global.css to clarify a few points quickly.
Designer’s CSS Code
In my source files the global.css is located directly in the root with index.html. I’ve grouped my styles into three main categories – global elements, body structure, and e-mail form styles.
Inside the core body I’ve added code for our wrapper class and to position the iPhone graphic. Each wrapper is contained within 660 pixels and centered horizontally on the page. Additionally the container div around our iPhone image is given a bottom border with the hex color #b4ada8. If you’ve noticed I chose to style this piece similarly to Milk’s Oink App for iOS.
/* @group core body */
#iphone-preview { text-align: center; border-bottom: 1px solid #b4ada8; margin-bottom: 12px; }
#iphone-preview img { margin: 0; margin-bottom: -2px; }

.wrap { width: 660px; margin: 0 auto; }
They use an outer glow on the iPhone and have matched colors for their app. Also, they’re using jQuery for a fade-in effect which I chose not to include. But this is a wonderful teaser layout to keep your visitors interested and begging for more info!
Setting Up MailChimp
This is the piece where things start to get a bit confusing. MailChimp includes a lot of their own custom code when you go to create a form. I actually had to edit out a lot of meaningless stuff from their generic code block – so don’t get discouraged if you can’t match up your styles exactly the same. My code will work 100% if you change both of the list subscription URLs generated automatically through MC.
So to get started head over into MailChimp and login. If you don’t have an account signup is totally free for under 12k e-mails/month (which is pretty realistic). After you log into the Dashboard look for a link at the top titled “Lists”. These are used to manage your subscribers for a specific topic – and this is how MailChimp will create your unique signup form tied into a list set. Create a new list, give it a quick name, and we should be set to go.
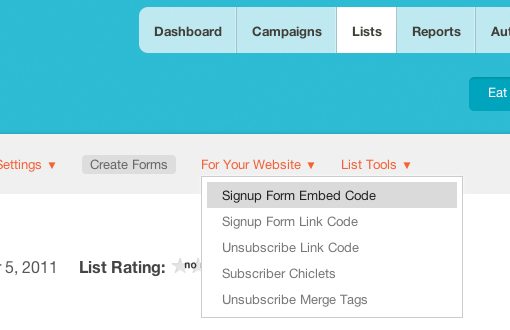
Once in the List Dashboard area you should notice a set of sub-navigation links. On the far right you’ll notice For Your Website and in the drop-down menu click Signup Form Embed Code. This is the code you’ll need to embed for a small signup form using MailChimp.
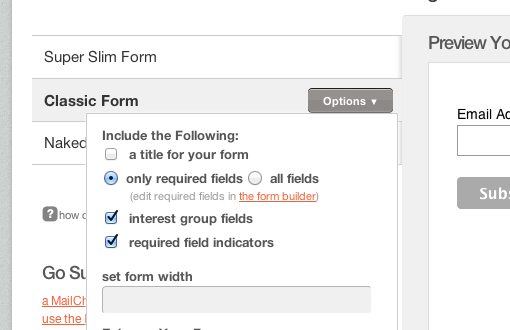
In the left-hand menu select Classic Form and customize the features to your liking. I’ve removed the title and just kept a standard e-mail field for signup. The code you need to copy is in the box below… so now we can go ahead and move on with our custom edits.
Customizing the Signup Form
Start out by removing the top style tag with all of their custom CSS edits. It’s nice they offer this, but we really don’t need it. Next if you look for the form element you’ll notice a very long URL in the action=”” attribute. This is one of the two custom URLs which will match up to your list. If you copy over from my code make sure to replace the form action with your own list URL – otherwise visitors will be signing up into my site!
<!-- Begin MailChimp Signup Form -->
<div id="mc_embed_signup">
	<form action="http://destinyislands.us2.list-manage.com/subscribe/post?u=8329c77b379de0413725b5380&id=9d70a869e7" method="post" id="mc-embedded-subscribe-form" name="mc-embedded-subscribe-form" class="validate" target="_blank">

	<div id="mce-responses">
		<div class="response" id="mce-error-response" style="display: none;"></div>
		<div class="response" id="mce-success-response" style="display: none;"></div>
	</div>

	<div class="mc-field-group" id="mcform-fields-group">
	<center><input type="text" value="" name="email" class="required email" placeholder="Email address..." id="mce-EMAIL" /></center>
	<input type="submit" value="Subscribe" name="subscribe" class="btn" />
	</div>

	</form>
</div>
Above is an example of what my form looks like after gutting all the MailChimp nonsense. It still contains a lot of the original code, but I’ve moved the error messages above the main input field. Also using the HTML5 placeholder attribute we can add default text into the e-mail field input before a user clicks.
Now the script tag is where people tend to get lost. If you notice two scripts you should check if one of them is the jQuery form validate.js file. If so you can remove it since we’ve already included this in our header. All of the other code is really used for checking if the form has been filled out properly. It’s very convoluted if you don’t understand jQuery, but luckily you don’t need to edit much of anything in here. If you copy the JS from my demo vs downloading from MailChimp you may experience differences if they have updated the backend since this publication. To play it safe just try working off my demo for now.
  var mce_validator = $("#mc-embedded-subscribe-form").validate(options);
  options = { url: 'http://destinyislands.us2.list-manage2.com/subscribe/post-json?u=8329c77b379de0413725b5380&id=9d70a869e7&c=?', type: 'GET', dataType: 'json', contentType: "application/json; charset=utf-8",
I do want to bring your attention to one final important aspect of the JavaScript code. The options variable is used to pass information to the Ajax call when checking for validation. You’ll notice another subscription URL in the jQuery, but if you have a keen eye you should notice this isn’t the same URL as before!
It’s very important that you have both of these URLs set properly. The form action calls a URI with /subscribe/post while the jQuery URL is calling /subscribe/post-json. Even if you copy/paste from my demo just updating these two URLs with your own will be enough to get the script working for you.
View Live Demo – Download Source
Conclusion
This has been a fast-paced introduction to setting up an iOS App website using MailChimp. We’ve downloaded an iPhone PSD from the Internet and setup a small application graphic. We’ve also utilized some basic jQuery and CSS3 modeling to create a fantastic e-mail signup form using Ajax. And with all of this tied into MailChimp you’re getting a great subscription service totally free.
Let us know your thoughts or questions in the comments area below. Additionally if you implement the tutorial code anywhere we would love to see it live! Include a link to your web page if you’ve set up a similar iPhone or iPad app template design.