Developing a jQuery Private Messaging Modal Box
You can build some really neat things using jQuery. The latest release bundle updates a lot of bugs and even hints at support for a new jQuery Mobile. With frontend scripting you can build practically any type of web application. But more specifically we’ll be looking into constructing a small modal box window.
I have designed the functionality to look and feel like a private messaging solution. This is perfect to implement on a user profile page or author’s page in a blog. We will be using some handy CSS3 techniques along with coding the page structure in HTML5. You don’t need to be a master jQuery artist to understand this tutorial, but it wouldn’t hurt to brush up on the basics. Check out my live demo example and download the project source code below.
The Ultimate Designer Toolkit: 2 Million+ Assets
Envato Elements gives you unlimited access to 2 million+ pro design resources, themes, templates, photos, graphics and more. Everything you'll ever need in your design resource toolkit.


Try It Out
View Live Demo – Download Source
The HTML Structure
Before we dive into jQuery let’s examine a bit of the HTML first. If you’re interested in examining the whole document layout I suggest downloading from the source code. But I’d like to focus on the modal box HTML code for further explanation.
I split the template using HTML5
.containmsg which holds our modal box and button to show/hide the contents. The modal container uses the class .mainCompose. This is also how we target in jQuery – let’s look at the HTML code for this below.
<!-- begin modal msg box -->
<div class="containmsg">
	<p><img src="img/compose.gif" alt="compose" class="compose" /></p>

	<div class="mainComposeD">
		<div class="calloutUp">
			<div class="calloutUp2">
			</div>
		</div>
		<div>

		<form name="sendprivatemsg" action="#" method="post">
			<label for="tofield">To</label>
			<ul class="userslist clearfix">
			<li><a href="https://designshack.net/author/jakerocheleau/" target="_blank" class="recipient">Jake Rocheleau</a></li>
			</ul>

			<div class="break"></div>
			<label for="mymsg">Message</label>
			<textarea name="mymsg"></textarea>
			<p>**Enter some text!</p>
			<div><a class="sendbtn">Send Message</a><img src="img/ajax-loader.gif" class="loader" /></div>
		</form>
		</div>
	</div>
</div>
<!-- @end modal -->
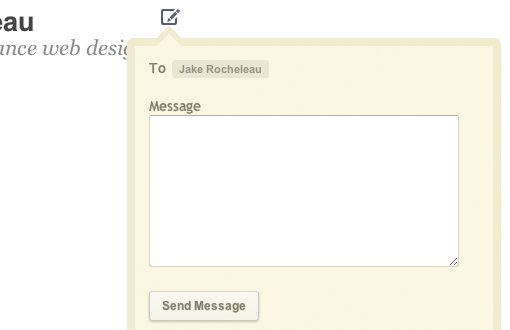
Inside our form element there aren’t any surprises. A small label and input message field. Also a to: field with a link to the user’s page. In this demo I linked to my DesignShack author page. It’s not required, though. You could even remove the link altogether and still keep the CSS styles in-tact. The users list is coded as a UL element so you could support messaging to more than one person.
Now before we dive into jQuery there’s one more technique I wanted to cover. If you click the compose icon you’ll notice our modal box has a small triangle tip at the very top. You could use images for this technique, but there is a simpler alternative using strictly CSS.
Cool CSS Tooltip Triangles
There is a small div which appears directly above the message form. This contains two classes labeled calloutUp and calloutUp2. The former behaves as a continuation of our outer border (the darker tan) while the latter connects to the center of our form area. Using both we can create matching triangles in a tooltip style connector.
This works because of a setting in CSS that makes all borders come together in center as a triangle. So we can set both of these divs to have no height or width, but massive borders. If we only give color to one of the borders and the rest are transparent we create the triangle effect seen here. Check out the CSS classes for both of the callouts.
.calloutUp { height: 0; width: 0; border-bottom: 12px solid #f0ecd0; border-left: 12px dotted transparent; border-right: 12px dotted transparent; left: 0px; top: 0px; margin-left: 30px; z-index: 10; }

.calloutUp2 { position: relative; left: -12px; top: 8px; border-bottom: 12px solid #faf7e3; border-left: 12px dotted transparent; border-right: 12px solid transparent; z-index: 11; }
I’m also setting details for the surrounding borders because this keeps the div block looking square. Otherwise our shape would turn rectangular, and then our triangles would come out lopsided with jagged edges. The z-index property is also important so that our inner tip will stay above the outer tip. The other styles are used to mockup our fonts in the demo example, certainly nothing extraordinary.
Developing Interactions with jQuery
Now we can delve into the good stuff! If you have used jQuery before you’ll likely be familiar with starting off a new document. First include the latest version of jQuery into your page. If you don’t wish to download and host the file yourself Google offers all versions of jQuery live for developers. The latest I’m using is library 1.6.2 mini.
Once that’s included you should open another script tag for JavaScripting. I decided to write my code within the head block of the same HTML page. But you could alternatively move this to the body, footer, or even into an external file. The first snippets of code I’ve added below.
$(document).ready(function() {
    $(".mainCompose").hide();
    $('.loader').hide();
    $('#errortxt').hide();


    $('.compose').click(function() {
    	$('.mainCompose').slideToggle();
    });
});
We call our $(document).ready() function to hold off on any actions until the page is finished loading. The first task is to hide 3 page elements right away. These are .mainCompose to hide our modal box, .loader to hide the ajax loading gif, and #errortxt which only displays if the user hasn’t entered anything and tries to submit the form. Each of these elements will only be displayed under certain conditions so it’s best to keep them hidden immediately.
And finally our first scripting action is checking for a click event handler. The .compose class is actually tied to our compose image even though there is no anchor link to be clicked. jQuery can handle the click events and call slideToggle() either way. Now the last bit of code to examine is how we can pull data out from user input.
Processing the Modal Form
We are only checking for one more final event handler. This is tied to the click event of our .sendbtn, which is actually tied to an anchor link in our modal box. Directly next to this is our animated ajax .gif image which was hidden right after the page loaded.
$('.sendbtn').click(function(e) {
	e.preventDefault();
	$('.sendbtn').hide();
	$('.loader').show();

	if($('#mymsg').val() == "") {
		$('#errortxt').show();
		$('.sendbtn').show();
		$('.loader').hide();
	}
	else {
		$('sendbtn').hide();
		$('.loader').show();
		$('#errortxt').hide();

		var formQueryString = $('#sendprivatemsg').serialize(); // form data for ajax input
		finalSend();
	}
The execution function right after our button is click now has a parameter. function(e) just passes the instance of our click event right into the function as a variable. We use this event selector to call the preventDefault() method so that our link doesn’t behave as a link. We also immediately hide the .sendbtn and replace it with our .loader image.
Next we pass into a standard if/else clause checking the #mymsg textarea value. If this contains no text then we know the user hasn’t entered anything. In this case we display our error message and re-hide the loading image while displaying our button again. Otherwise we enter the else{ } clause which assumes we can send the message!
I haven’t written any Ajax/PHP code since it jumps out of range of this tutorial. But you should check out the jQuery ajax() function which can speed up backend development tenfold. I have set aside a variable formQueryString which can be used to pass the form data into an Ajax call. Instead I’ll be just finishing up the aesthetics in a small function finalSend();
	// possibly include Ajax calls here to external PHP
	function finalSend() {
		$('.mainCompose').delay(1000).slideToggle('slow', function() {
			$('#composeicon').addClass('sent').removeClass('compose').hide();

			// hide original link and display confirmation icon
			$('#composebtn').append('<img src="img/check-sent.png" />');
		});
	}
});
What we want to do now is close our modal box and display a small check icon to let the user know everything is fine and dandy. I’ve used .delay() to keep the modal box open for 1 second before calling our final slideToggle() method. This was added solely for appearances in this tutorial so you can see how it looks waiting for the server to load. If you want to keep your users waiting an extra second you could leave this – but it serves little point otherwise!
After the slide animation I’ve added a callback function. It only includes 2 lines of basic code. First we target the compose icon and change its class from .compose to .sent, then hide it from view. Finally we target #composebtn which is the container div of our icon and append a new check mark icon. Now our users know the message was sent and we’ve barely used any screen real estate!
View Live Demo – Download Source
Conclusion
This tutorial should have gotten you a bit more comfortable building a scalable modal box in jQuery. We have built some great CSS styles and used some basic form processing to enhance the user interaction. There is certainly a lot you could add on but our example lays the ground structure and paves the road for higher possibilities.
If you’re still looking to check out my demo or download the source code you can do so below. Reading code can be confusing after long periods of time, so I recommend downloading the source directly to get a better idea of how this small app functions. Similarly if you have any questions or ideas you can offer them in the discussion area.